The Freeform app includes a wide variety of pre-designed “clip art” shapes that you can use in your projects, including basic shapes, geometric shapes, objects, animals, food, nature scenes, symbols, educational illustrations, art and science images, people, places, activities, transportation, work-related images, and decorative ornaments. These shapes are organized into categories for easy browsing.
You can customize the shapes in a number of ways to suit your needs. For example, you can stack multiple shapes on top of one another using the layering feature, change the color of the shapes, draw over them with the drawing tools, resize them using drag and drop gestures, break the component pieces apart and manipulate them individually, add various borders, group them together, adjust the opacity, and more.
Add lines, arrows, and curves
- On a board, tap
 .
. - Choose a line type from the Basic tab.
- Tap on the line to bring up the formatting tools. Different types of lines have different options. Tap any of the following:ToolDescription
 Change the line style.Note: The color of the line button changes to reflect the current color of the line.
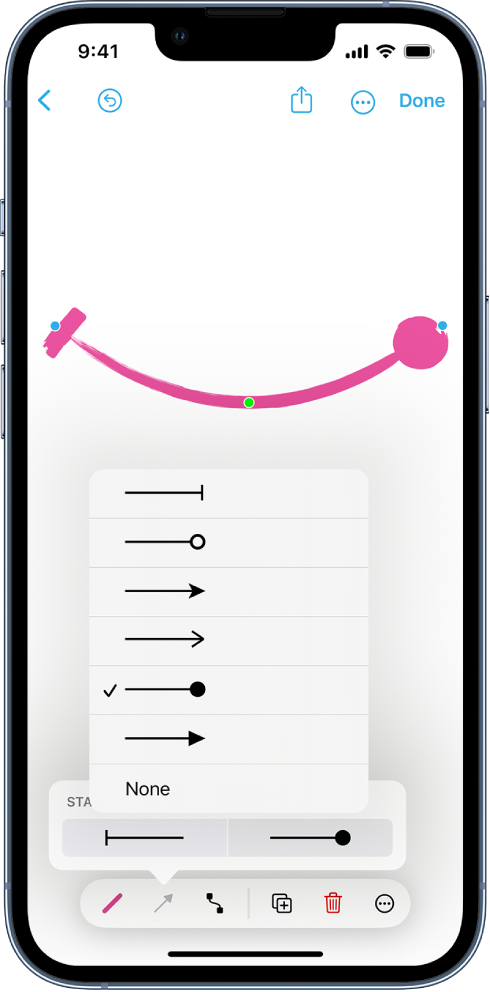
 Turn lines into arrows, or add other styles of endings.
 Change the connection line style.Note: This button appears only for curves and connection lines.
 - Tap the line to display a series of dots. Drag the blue dots to alter the shape’s size or proportions. For connection lines, you can use the blue dots to attach an endpoint to something else on the board. To adjust the arc on connection lines, drag the green dot.

Add shapes
The shape library has an abundance of shapes, including many from different categories. There are hundreds of shapes available in the shapes library.
- Open a board then tap
 , then choose a shape.
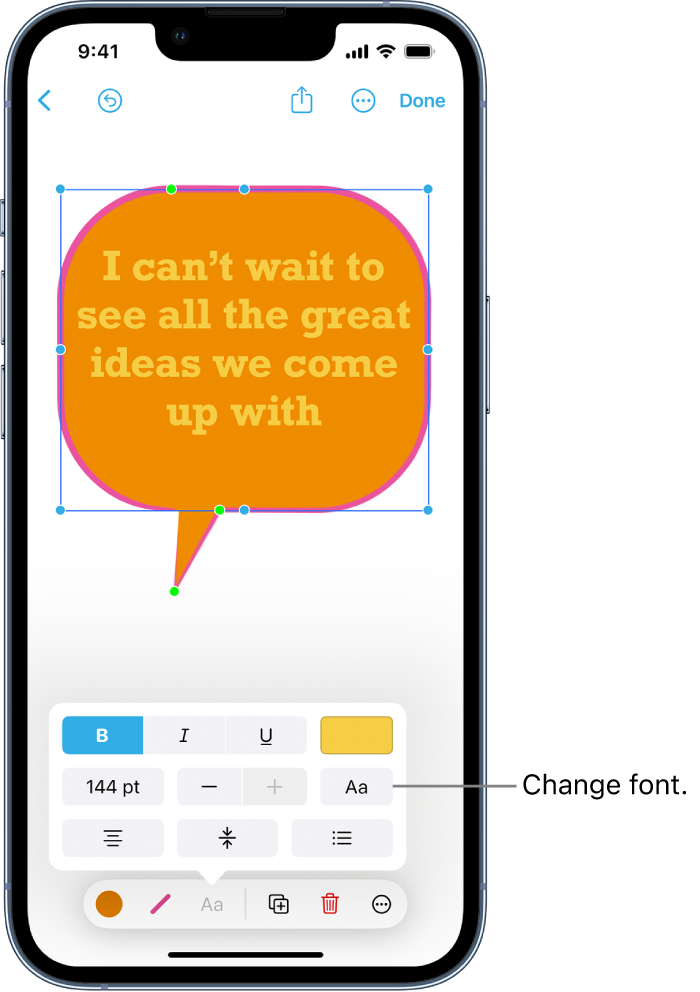
 - To insert text into a shape, double-click inside the shape and enter your desired text. To modify the text after insertion, double-tap the shape again.
- With the shape selected, tap to show the formatting tools, then tap any of the following:ToolDescription
 Change the color.Note: The color of the button changes to reflect the current fill color.
 Change the border.Note: The color of the button changes to reflect the current border color.
 Format text.
 - Editable shapes can be resized and reshaped by tapping on them to reveal dots. Drag the blue ones to change the size and proportions of the shape, and the green dots to alter aspects specific to the shape, like its number of sides.

Put an image into a shape
You can use a shape as a mask or frame.
- Insert a shape, position it over an image, then select both the shape and the image.
- Tap
 , then tap Mask with Shape.
Or drag an image onto a shape to use it as a frame.
Combine shapes
You can make a new shape by combining one shape with another, or you can also subtract shapes from each other, or even remove the overlapping area between them.
- To connect multiple shapes, touch and hold one shape, then tap any other shape you’d like to add.
- Tap
 , then tap an option to unite, intersect, subtract, or exclude.
Split shapes apart
It’s possible to divide a compound shape into its components, allowing you to edit each one separately. For example, if you have a map of the United States (located below the Places tab), you can separate each state and change its individual color, providing a unique visual effect.
- Tap the shape to select it, then tap it again to see the formatting tools.
- Tap
 , then tap Break Apart.